Thursday, November 25, 2010

Paper Trey November Blog Hop Challenge

Hola,

Primeramente muchas felicidades y bendiciones a todas en este día. Hay muchas razones por las que dar gracias en el día de hoy. Aunque este año ha sido bien fuerte para Miguel y para mi, es motivo de celebración que hayamos podido afrontar las cosas unidos junto a nuestras familias, con salud y sobre todo la esperanza en Dios de que las cosas se van a solucionar.

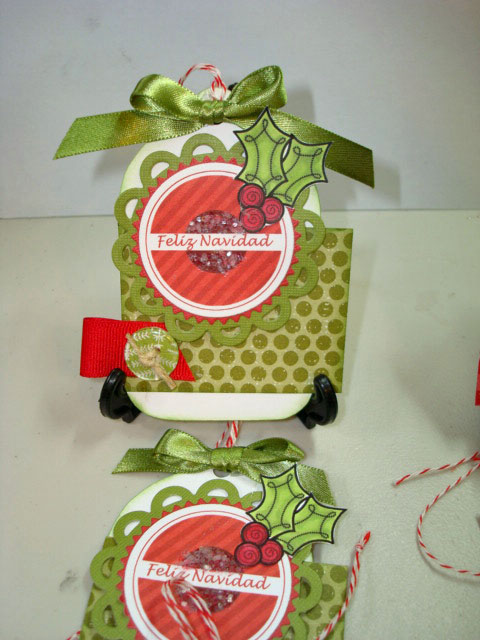
Aquí les muestro varios tags que he estado trabajando en estos días. El reto de este mes en Paper Trey consiste en preparar tags cion tus productos favoritos. Es la primera vez que participo de ese evento y en verdad que siento mucha emoción de hacerlo. Disculpen las fotos que no son las mejores, pero entre cocinar, limpiar, y todas las demás cosas que estoy haciendo hoy pues no me daba tiempo de tomar unas fotos mejores. Espero que les gusten.

Feliz día de acción de gracias!


Hi,

First of all I want to wish you a happy day full of joy and blessings.

I have another quick post for today full of photos. I have been working on some tags and today it's time to share some of them in order to participate in PT's November challenge. It's my first time participating in this event and I am excited about it. With no further introduction I present you some of the tags I have been making, hope you like them.

Happy Thanksgiving!!


Show Me #3


Hi,

This is a quick post to show you the Christmas madness I have right now in my SB Room. WOW, looking at the photos is more disturbing than being in the middle of it... you can even see that I have card stock in the floor which by the way I AM using, it's just that the floor was the only free space I had to sort it out :()

Right now I am working on 5 sets of tags, and my next project will be... The color me challenge at Sassy Cheryl's blog!!! I have been purchasing the stamps from the challenge but never had the nerve to participate. Today I want to sit down and color my image.

Well, as promised a short post. I leave you with some disturbing photos.... LOL!


Things I've done so far:


Thing's I'm working on:


My insane world:


Crazy huh!

Monday, November 22, 2010

WINTER BIRDS

Hola,

Hoy les tengo un set de mini tarjetas. Para el mismo usé dos imágenes digitales del kit de Noviembre de Bugaboo stamps. Durante el mes de noviembre ella tiene todo en la tienda al 50% verifica pues tiene unos sellos bellos y bien graciosos.

Para preparar las tarjetas usé las nuevas técnicas de “sponging” que estoy aprendiendo en una clase que estoy tomando por Internet con Kim Teasdale y además use mis Copics para pintar los pajaritos. Solo le puse un lazo a cada tarjeta pues en este caso quería que fueran bien sencillas.

A mi me encantan las tarjetas 3X3, pero hasta ayer la parte de los sobres siempre fue un problemas pues no se consiguen en todos lados. Hace un tiempo había conseguido por medio de una amiguita unos sobres transparentes a muy buen precio, pero se me han ido acabando y los que he visto por Internet son bien caros. Así que me puse a pensar que quizá utilizando papel de maquinilla normal podría hacer unos sobres económicos. La cosa es que me puse a trabajar con mi nueva tablita de hacer dobleces de Marhta Stewart y el resultado fue muy positivo. Logré hacer los sobres y hasta los decoré, lo que hizo que el set de mini tarjetitas me gustara aún más.

Espero que les guste!!


Hi,

Today I have a 3X3 card set. I used two of the images included in the November kit of Bugaboo Stamps. They have all of their digis at 50% discount for the month of November so check their store since they have fabulous images.

To color the images I used my Copics and the sponging technique I have been practicing later since I am taking an internet course with Kim Teasdale. I didn’t add too much embellish to the cards since I wanted the image to stand alone.

I love 3X3 cards, but the envelopes for them have always been a challenge since they are not easy to find. Yesterday as I was making my cards I thought that with plain computer paper I could make my own envelopes. It was a great success!! I even decorated them as you can see in the picture. They may seem time consuming but trust me, once to get used to make them they take no time at all.

I hope you like it.


Sunday, November 21, 2010

SEASON'S GREETING FRAME

Hola!

En estos días he estado trabajando en este marquito que Miguel me pidió para adornar nuestra casa. Estoy bastante complacida con el resultado. Use el file de North Pole de My Scrapchick, tan pronto vi ese file me enamoré de el. Poco a poco estoy redactando un tutorial donde explico varios detalles de cómo fui montando las piezas y varios consejos de cositas que hago que por lo menos a mi me gusta hacer para que mis piezas se vean como yo quiero.

Espero que les guste.

Hi!

Over the last couple of days I have been working on this frame that my DH asked me to make to decorate our home. I am preparing a simple tutorial in which I will explain a few tricks and things I always do when mounting my images. I used the North Pole file from My Scrapchick. I fell in love with that file as soon as I saw it.

I hope you like it.


Aqui hay unos detalles adicionales / Here are a few more details:


Thursday, November 18, 2010

FLOWER CARD SET


Hola,

Les muestro un set de mini tarjetitas que preparé como uno de mis regalitos de navidad. Son bien sencillas pues le quise dar énfasis a las flores que hice con tela. Este año si que me he ido preparando con tiempo haciendo los regalitos para mis amistades y familiares.

Las flores las hice con tela de chiffon en varios tonos. Use la colección de BG Urban Prairie porque me gustó como combina con los colores de las telas que tengo. Puedes encontrar el tutorial para hacer la carterita >>aquí<<>

Espero que les gusten y gracias por las miraditas.

Hi,

Today I show you a card set I made as a Christmas gift. They are very simple since I wanted to give emphasis to the handmade flowers. I started very early this year making my gifts since I don’t want to have another year full of stress finishing the gifts at the last moment.

The flowers are made with Chiffon in different tones that complement each other. I used the BG collection Urban Prairie which goes great with the fabric colors I had at hand. You can find the tutorial to make this cute box over >>here<< style="">

Thanks for the visit and enjoy your day!!


Saturday, November 13, 2010

SPONGING, SPONGING AND MORE SPONGING

Hola,


Quiero compartir con ustedes unas tarjetitas que hice hoy para practicar la técnica de pintar con esponjas. Estoy tomando el curso de Sponged Ink Backgrounds for Cards en My Creative Classroom y en verdad que me encanta. La clase la esta dando Kim Teasdale, me encanta como trabaja esa chica. Si no has visto sus trabajos visita su blog para que te deleites de lo bello que pinta y el buen uso que le da a los stamps. Bueno, con lo poco que he aprendido he hecho estas dos tarjetas que espero sean de su agrado.

Como siempre gracias por las tiernas miradas.

Hi,

Today I want to share these two cards I made to practice the sponging technique. I am taking the course Sponged Ink Backgrounds for Cards at My Creative Classroom and I really like all I am learning. Kim Teasdale is the instructor and she is a great artist, I just love the way she color her images and the great use she gives to stamps.

I hope you like my cards. Have a great Sunday!!

Wednesday, November 10, 2010

PREMIOS CIBERNETICOS

Hola!

Mi amiguitas Jay y Edelmira me ha enviado este premio que me dio mucha alegría.

Jay es una de las personas que me ha ensenado mucho desde que comencé en este hobby, y hace unas bellezas tanto en papel como en trabajos digitales, no dejen de pasar por su blog para que vean por ustedes mismas. Muchas gracias amiguita!

Edelmira es otra talentosa chica quien encuentro tienen una gran creatividad y me encanta leer sus entradas al blog. No solo hace unas cosas bien lindas sino que su manera de escribir me gusta y capta mi atención. Si aun no la has visitado pasa por su blog para que veas de lo que te escribo.

Para ambos premios las reglas son las siguientes:

1. Darle las gracias a la persona que te lo envío.

2. Copiar el premio en tu blog.

3. Compartir tres (3) cosas que más te divierten o te gusta hacer.

4. Enviar este premio a cinco (5) personas.

Mis contestaciones:

Gracias Jay!! Has alegrado mi mañana. Este es el premio que Jay me envío:

Gracias Edelmira!! Me alegraste también pero la tarde de ayer que fue cuando leí tu notita en mi blog LOL!! AH!! Y ojala los cupcakes fueran de verdad hmmm!! Este es el premio que me dejo Edel:

Tres cosas que me divierten o me gusta hacer:

1- Hacer manualidades con papel.

2- Ver televisión con mi esposo y jugar con mis gatitas.

3- Compartir con mi familia.

Yo le quiero enviar este premio a las siguientes personas:

1- Jessica

2- Frances

3- Karin

4- Karina

5- Maribel

Que tengan un buen dia!!

Wednesday, October 27, 2010

A COLORFUL TRIO

Hola!

Aquí les muestro un set de Topiaris que había hecho desde hace ya par de meses. Solo me faltaba conseguir el tiestito donde ponerlos y finalmente lo conseguí hace par de semanas. Lo voy a colocar en la sala de mi casa también cerca del cuadrito que les mostré hace unos días. Las florecitas son hechas a mano (si, una a una). Las hice utilizando los stamps de Bloomers-Coronado Island. Aunque estas flores se pueden hacer sin los stamps, me gusta usarlos porque dejan una impresión sobre la flor lo que te permite que quede en dos tonos. De ahí que las florecitas blancas tienen un todo de rosa, azul o anaranjado. Y también todas quedan del mismo tamaño lo que hace que el trabajo se vea mas uniforme.

Por el momento no tengo más piezas de Home Decor para mostrarles. Las otras cosas que estoy haciendo están aun en proceso, pero en la medida en que las vaya terminando se las iré mostrando. Como verán mi casa esta decorada con muchos colores. Como diría mi amiga Tere…. Pa’ circo no tiene precio…. Pues entonces…. QUE SIGA LA FUNCION!!!

Que tengan un buen día y gracias por la visita.

HI!

This is a set of trees I made a few months ago and finally I purchased the little tins to finish them. I used the Bloomers Stamps from Coronado Island to make the flowers. Although you can make these flowers without the stamps, I like to use them because not only I can make my flowers in two tones (like the white ones) but also because they have the same size making it easier to finish the Topiary.

I will be showing you more pieces of Home Décor as I finished them. As you can see I love colors and those extents to my decoration. Life is so grey sometimes that I need to have a cheerful place to come every day.

Have a great day and thanks for the visit!!


Saturday, October 23, 2010

HOME SWEET HOME

Hola!

¿Que mejor cosa que uno llegar a su casita todos los días a disfrutar del amor y del ambiente que nos hace sentir felices? Con eso en mente es que durante mis vacaciones me dediqué a preparar este cuadrito que hice para adornar mi casa y darme a mi misma la bienvenida todos los días. Hace tiempo estaba por hacerlo y resulto ser de las pocas veces que algo me queda tal y como lo visualicé.

Para hacer el cuadrito use un canvas 5 X 7 el cual pinte con pintura acrílica de Memory Makers en Sky y Celery y la calle la hice pintando una línea con tinta Craft negra de SU! Todas las demás imágenes fueron estampadas y recortadas en dos tonos para darle las tonalidades a las puertas y ventanas y recortadas para darles dimensión. El marco es uno de fotos que compre en Costco al cual le di una primera capa de Gesso y luego pinte de manera tal que le diera continuidad al canvas. Le añadí toques con pintura de color “Expresso” en los bordes y el interior del marco para que tuviera más profundidad. La cinta y el lazo se los pegue con mi pistola de calor. Las letras las corté con la Cricut y un font que ahora no recuerdo, pero cualquier letra ancha haría el mismo efecto. Luego de cortadas las decoré con lentejuelas, yute y rhinestones.

Si tienen alguna pregunta sobre el proyecto, me escriben a mi e-mail que con gusto les contesto. Que tengas unas buenas tardes y un feliz domingo mañana.

Hi,

Is there a better feeling than arriving each evening at your home to be with your family and enjoy the things that really makes you happy? With that in mind is that I created this home decor during my vacations last month. I am very pleased with the results since this is one of those times where the final results are just as I imagined them.

For this project I used a 5 X 7 canvas and a picture frame I bought at Costco a while ago. I painted them with Memory Makers acrylic paint in sky, celery and espresso. I loved playing with gesso and acrylics paints and see a lot of projects using these materials in the near future. I stamped each house in two tones (brown for the windows and doors) and then paper pieced them and mounted in the canvas with mounting tape to give them more dimension. The letters where cut with my Cricut and SCAL and decorated with sequins, rhinestones and hemp.

Thanks for your visit and if you have any question please send me an e-mail and I will be very happy to answer you.

Have a great evening and a happy Sunday tomorrow.


RECIPE:

5X7 Canvas

Photo Frame

Gesso

Acrylic paint: Memory makers in Sky, Celery and Espresso.

Black and White craft ink SU!Tangerine Tango, Soft Suede, Bermuda Bay, Riding Hood Red and Melon Mambo.

Hemp, sequins and rhinestones

CTMH In the Neighborhood stamp set.

Neenah white cardstock

SU! ink in

Misc ribbon from my stash

Felt and buttons for the sun

Sunday, October 17, 2010

ORNAMENT CARD


Hola,

Me siento cansada pero feliz porque he estado todo el día haciendo lo que me gusta. Me he dedicado a seguir con los preparativos navideños. En esta ocasión les quiero mostrar una tarjeta que prepare simulando adornos navideños. Me encantó como quedó con todas las capas y costuritas.

Espero que les guste y gracias por la visita!!


Hi,

I feel tired but happy because I have worked all day long making Christmas gifts. I want to share with you today this card. I love the way it turned out with all the layers and stitching. I still don’t know who is going to receive it, but this one will be put aside for the very special people in my life.

Thanks for your visit and for leaving me some love.


Recipe:

Finished size 4.25 x 5.5

SU Craft paper

BG design paper Jovial Collection

Paper Trey Holiday Button Bits stamp set

Clear buttons from stash

Kaiser Crafts red rhinestones

Floss from stash

SU Heat & stick powder and super fine glitter

Thursday, October 14, 2010

JOY CARD

Hola,

Aquí les muestro una tarjetita 4X4 que hice utilizando el mismo font del mini set que compartí ayer con ustedes. Me gusto mucho el toque de azul en una tarjeta navideña. Espero que les guste.

Hi,

This is a 4X4 card I made using the same font as the mini set I shared yesterday. I love how the blue color stands in this Christmas color scheme.


Gracias por la visita.

Thanks for the visit.

Tuesday, October 12, 2010

JOY MINI CARDS SET


Hola / Hello,

Espero que se encuentren bien. Yo estoy enferma así que no he podido tener la diversión que esperaba en el día de hoy. Quiero compartir con ustedes este set de mini tarjetas que hice hace par de semanas pero que aun no había fotografiado. Este es un trabajo Hibrido. Utilicé un font llamado LD Nativity que compre en Scrap and Fonts. Cada letra mayúscula del set tiene un pesebre. Lo que hice fue segregar el pesebre y usarlo como mi imagen central. Con las letras minúsculas del set escribí la palabra JOY. Luego lo imprimí dos veces, una en la base de la tarjeta y en un pedazo de papel. Las pinte usando mis Copics. Aunque no tengo mucha técnica pintando con ellos, el resultado final me parece bastante razonable.

Hope you all doing fine. Today I have been sick so there was not as much fun here as I expected. Still, I want to share a 3X3 set I made a few weeks ago. I used a font name LD Nativity which I purchased at Scrap and Fonts. I love the results. This is a hybrid card; basically I segregated the manger from one of the letters and used it for the main image. In this set all capitals have a manger in it. I used the lower case for the JOY word. I printed the image twice in the card base and on a scrap of white paper, and then colored it with my Copics. I still need a lot of practice coloring with those markers, but still the results are kind of cute.


Espero que les hayan gustado. Pendientes porque tengo mas proyectos que aun no les muestro. Gracias por la visita!!

Hope you liked them. I have a few more projects to share with you so see you soon.

Besitos,
Joan

Monday, October 11, 2010

HELLO CHRISTMAS!!!

Hi,


it’s been a long time since my last post. I have been working a lot, but most of all spending time with my DH. That doesn't mean I have not been working a few things I will be sharing with you over the next days. Anyway, as you know Christmas is my favorite time of the year, so for me that's enough motivation to start blogging again.

Today I want to post a wall hanging I made yesterday. This year I decided that the new Christmas decorations will be handmade by me. After all we all have endless supply of materials to decorate a shopping mall hehehe!! Anyway, the nativity is mounted on a 4X6 canvas which I painted and decorated to simulate a night scene. It's my first attempt at making a night scene so please, be kind LOL! I used the Nativity 1 digital cut set from My Scrapchick. I thought it was going to be difficult to mount all the little pieces but it was quite easy. I plan to make a few more to give to family and friends. It will make a great Christmas card...don't you think?

See you tomorrow when I will post a 3x3 card set I made last week.

Have
a Great Day,
Joan