Tuesday, April 19, 2011

FLOWERS AND BUTTONS

Hola!

Hoy les muestro este set de tarjetas que preparé hacen días para regalarle a mi hermana en su cumpleaños. Me gusto mucho porque el negro hace que los colores resalten y se vean más brillantes. Las tarjetas no tienen sentimiento porque mi hermana las prefiere en blanco para poderlas usar en cualquier ocasión. Lo más que me gusta de regalar tarjetas hechas por mi es que siempre la reacción de la persona que las recibe me llena de satisfacción. Lo malo es que invariablemente me dicen que no las van a usar porque son tan lindas que se le acaban. ¿Alguna vez te ha pasado eso? Bueno, a mi me pasa a menudo…

Hi!

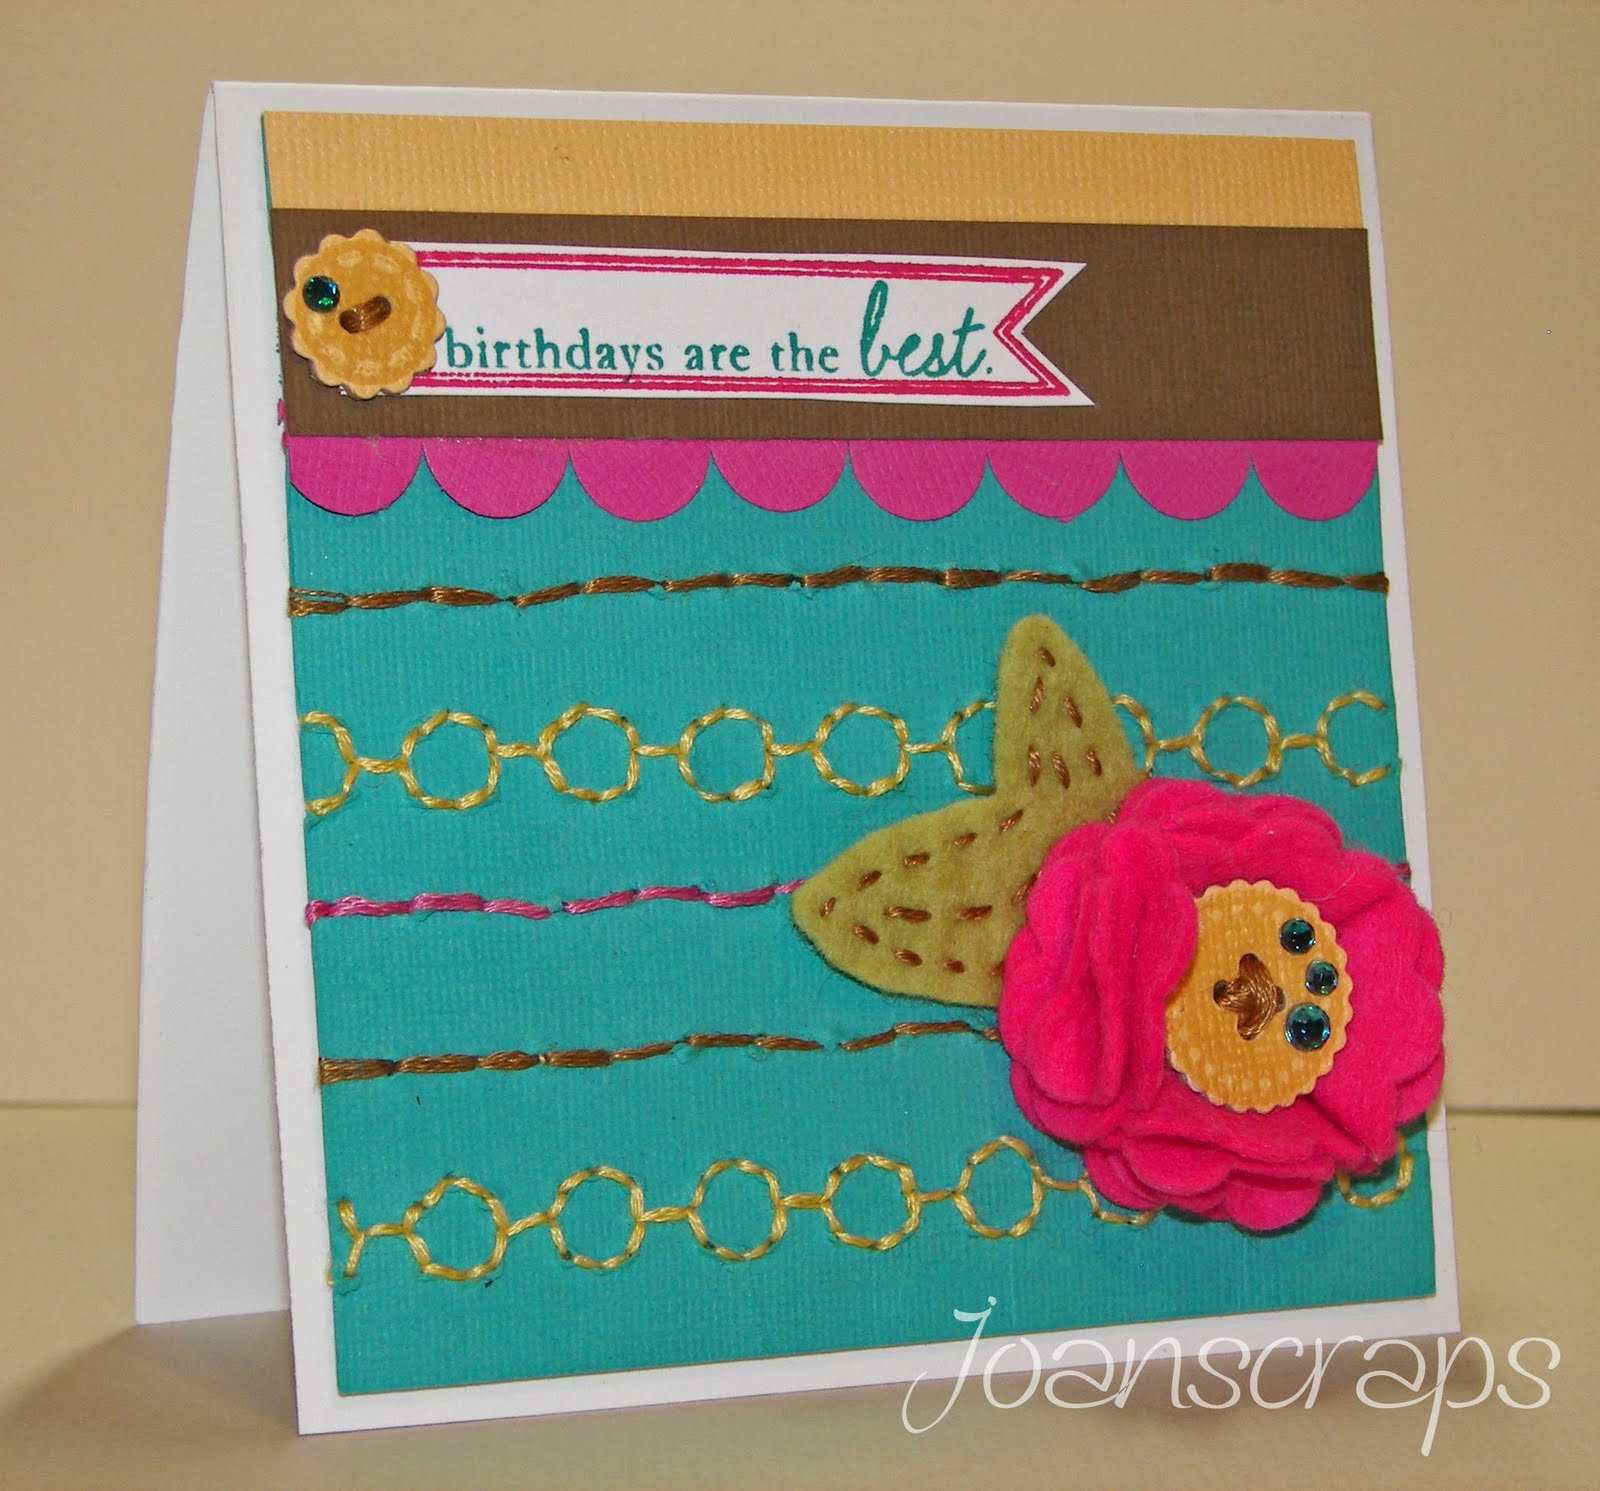
Today I want to show you a card set I made for my sister. It was very easy to put together and love how the black makes the colors pop out. They don’t have any sentiment since my sister prefers them in blank so she can use them for any occasion. I love to give hand made cards; they always put a smile on the person receiving them. The bad thing is that they always tell me that my cards are not to be used because they are so beautiful LOL!

Para empacar el set utilicé una de las cajas donde vienen los stamps de Paper Trey. A mi estos sellos me encantan no solo por lo bellos que son, sino porque su empaque está lleno de posibilidades.

The set is wrapped in a Paper Trey box. I love to buy these stamps not only because they are really pretty but also because their packaging is full of possibilities.

Usé papel de computadora para hacer los sobres y los decoré con stamps y tintas en los mismos colores de las tarjetas.

I used computer papaer to make the envelopes and decorated them wit stamps and ink in the same colors I used for the cards.


Espero que tengan un lindo día.

Hope you have a wonderful day.


Recipe:

Neenah white cardstock

AC Cardstock in varipus colors

PT stamp set Polka Dots Basics II and Blooming Button Bits

Transparent buttons

Black Gel Pen

Computer paper to make the envelopes

A PT stamp Box packaging and tissue paper

Friday, April 15, 2011

THE GIFT WRAP CHALLENGE

Hola,

Hoy les muestro este set de cajita con su tarjeta que hice para un regalito. Me encanto el resultado y me alegre que a mi hermana le gustara también.

Today I want to show you this gift wrapping set I made for my sister. Yesterday we celebrated her birthday and I wanted to give her something special… I loved how it turned out and it makes me happy that she liked the gift too.

El borde de esta circulo lo hice con “tissue paper”. Lo estampé en anaranjado usando un stamps de Paper Trey y le hice los cortecitos con una tijera. Luego adherí el papel al circulo y recorte el borde para que se viera uniforme.

I made the ruffled border in the circle with white tissue paper. I stamped the paper in orange and make lot of slits with a fringe scissor, then glued the strip of paper to the circle and trimmed off the excess.

Me encanta este pajarito de Paper Smooches…. Bello!!!

I love this little bird from Paper Smooches… so cute!!

El sobre en realidad es una bolsita que decore, tenia deseos de hacer algo diferente al sobre tradicional.

The envelope is a glassine bag. I just wanted something different than the traditional envelope.


Y esta es la cajita…. Bella!! La corté utilizando un file de SVG Cuts. Súper sencilla de hacer y en verdad el resultado me encanto…

And this is the super cute little box. I cut it using a file from SVG Cuts. It’s super easy to do and the results are stunnig!!


Mañana les tengo otro set de tarjetas. Estas pasadas semanas me he dedicado a preparar sets de tarjetas y en verdad es súper divertido. Si te decides participar de los retos en el blog Moxie Fab World ten cuidado porque te aseguro que son adictivos.

Tomorrow I will show you another card set. This last weeks I committed myself to make card sets every time I had a chance and it has been very relaxing. If you decide to participate in the Moxie Fab World challenge, be careful…it can be addictive.

Que tengan un bello dia!!

Have a great day


Recipe:

Love

PT Background Basics Gingham

Paper Smooches Birthday Buddies

White Tissue Paper

Ink in Orange and brown

SU Natural White cardstock.

DP paper My Minds eyes... can't remember the collection

Misc: Button from my stash, ribbon and twine

Thursday, April 14, 2011

COLORS AND BUTTERFLIES


Hoy les muestro un set de mini tarjetitas que hice para algún regalito que tenga que hacer de momento. También para continuar con la celebración de la edicion especial de Paper Crafts “350 Cards and Gifts” El set es súper sencillo de hacer, con mucho estampado como me gusta. Una buena oportunidad para utilizar los pedacitos de retazos de papel que guardamos y muchas veces no sabemos que hacer con ellos. Me inspire para este set en este set que se publico en la tarjeta de Cristina Kowalczyk, El set super sencillo y de verdad que me encanto desde que lo vi. Creo que ese ponchador va a subir en la escala de mi lista de deseos.

A parte de este set he estado ocupada en varios proyectos a la vez los cuales les mostrare pronto. Por el momento espero que pasen un lindo día y que hagan algo lindo y creativo hoy.


Today I want to show you a mini card set I made to continue the celebrations of the Paper Crafts issue “350 Cards and Gifts”. My set was inspired by this fabulous set from Cristina Kowalczyk. I loved how delicate it looks, also very simple to case. It was very easy to put together and the best part is that I got to use a lot of scraps… those little papers that get to our nerves but we simply can’t get rid of them…. Yeahhhh… you know what I’m talking about!!!

I also have been very busy with a lot of projects I will be showing you soon. Have a great day and I hope you can do something creative and beautiful today.


Besitos,

Joan


Recipe:

Love

PT stamp set Polka Dots Basic II

SU! cardstock in various colors

SU! Stamp set mini buttons

Nestability butterfly die

Sentiments from TAC

Thursday, April 7, 2011

MY NEW OBSESSION

Hola

Desde hacen varios meses llevo jugando y experimentando con el material Polymer Clay. Hace un tiempito Betsy Veldman publicó en su blog su experiencia con este material y uso unos moldes de Mold Muse en flores. Así que me pedí mis primeros moldes de flores y varias otras formas para crear mis adornos con este material. La dueña de la tiendita se llama Ludi y es una chica súper agradable y complaciente.

Esta tarjetita que les presento hoy esta adornada con unas florecitas que hice con uno de los moldes de Ludi. Me encanta como complementan las maripositas dándole dimensión sin que sobrecargue la misma.


Hi!

I have been playing for a few months now with Polymer Clay. Recently Betsy Veldman posted a project featuring a mold by Mold Muse. I went and placed my first order of molds and as soon as I made my first flower I was instantly in love with the molds and my love for polymer intensified. Ludi which is the owner of Mold Muse is a super nice girl and I love her service and support. Thanks Ludi!!!

Today I want to show you a card I made using one of Ludi’s molds. I love the look of the butterflies with the little flowers. They give the card a lot of texture and color.


Este es el molde que utilice en esta ocasión. Se llama Cabochon 6 cavity Flexible Silicone Mold/Mould y lo pueden conseguir >>aqui<<.

And here is the mold I used. It’s called Rose Cabochon 6 cavity Flexible Silicone Mold/Mould and you can find it >>here<<

Espero que tengan un buen día!! / I hope you have a great day.


Recipe:

Cardstock: SU Natural White

Punch: MS Butterfly, EK Sucess Scallop

DP: Basic Grey June Bug collection

Flowers made by me ;)


Wednesday, April 6, 2011

FLOWERS AND GIFT CARD


Hola

Esta semana se está celebrando el lanzamiento de la nueva edición de la revista Paper Crafts que se llama “350 Cards & Gifts”. Durante esta semana en el Moxie Fab Blog y el blog de Paper Crafts se están lanzando diferentes retos relacionado a la revista. Ya me compré la mía y les aseguro que está llena de hermosas ideas para preparar regalitos.

La siguiente tarjeta la hice para el reto del “gift card holder”. Utilice además el sketch 185 de Mojo Monday. Durante este mes les seguiré mostrando más tarjetas y proyectos relacionados a esta revista.

Que tengan un hermoso día!

Hi,

During this week the Moxie Fab and Paper crafts Blogs are celebrating the release of their new Issue 350 Cards & Gifts. They are having a lot of challenges. I purchased mine already and can guarantee you that it is filled with lots of great ideas.

I made this gift card holder using the sketch 185 of Mojo Monday. During this month I will be posting different projects that will be inspired on this issue and the different challenges on the PC blogs.

Have a great day!!


Recipe:

Cardstock: SU NAtural White & DCWV Red
Ink: SU Almost Navy
DP: Basic Grey June Bug Collection
Misc: Buttons, ribbon, white gel pen and Liquid Pearls from Ranger

Sunday, April 3, 2011

YO TENGO TU LOVE.... YEAHH!


Hola!
¿Alguna vez han escuchado una canción que les ha provocado sentir mucha alegría? Cuando escuche la canción de Siete “Yo Tengo Tu Love” eso fue lo que me pasó. Mi mente se llenó de colores, flores y mil cosas bellas y me dio un deseo grandísimo de crear tarjetas y jugar con mis papelitos.
Aquí les presento una tarjeta y también un set de tarjetas que preparé para guardarlas y usarlas como un regalito cuando lo necesite. Hoy quiero celebrar el amor que me rodea y las cosas lindas de la vida!!
Hi!
Have you ever heard a song that instantly makes you happy? That’s what happened to me when I first heard Siete’s song “Yo Tengo tu Love”. Mi mind was filled with colors, flowers and a lot of wonderful things. I felt a sudden rush to create cards and play with my papers.
Today I show you a card and a card set I made with this song in mind. Let’s celebrate the love in our lives!!


Y aquí esta la canción de las que les hablo. Espero que la disfruten.

And here is the song, hope you like it.

Saturday, March 5, 2011

A REJECTION WITH A TWIST ;)

Hice esta tarjeta para someterla a Paper Crafts asi que este viene a ser mi segundo rechazo. Pero la parte buena es que lo use para el reto del Tuesday Trigger en Moxie fab esta semana. Esta es una combinación de colores inusual en mi estilo, pero me encantó el resultado y lo alegre que se ve la tarjeta. La base en el sketch # 57.

This is my second reject. It's based on the sketch # 57. The coolest part is that I get to use it for this week Tuesday Trigger at Moxie Fab. Isn't it a great twist?? This is not a usual combination for me but I like the results and how bright and happy it looks.


Relevant facts / Datos relevantes:

1- I used brown flock for the flower center. / Utilize “flock” brown para el centro de la flor.
2-
I sponged the circle in brown. / Utilize la tecnica de sponging para el circulo brown.

Recipe:

Finished size: 4.25” Square

Technique: Paper Piecing and sponging.

Cardstock ; Stampinup.

Dies: Nestabilities, Circles and mini scallops circles

Ribbon: SU Chocolate Chip

Stamps: PT, Year of Flowers Daffodils and Backgrounds text style II.

Inks: Distress Inks in Antique Linen

Misc: Copics, Perfect Pearls from Ranger

Friday, March 4, 2011

Rejection Blog Hop


Hola!

Ayer luego de NO recibir un e-mail de Paper Crafts aceptando alguna de las tarjetas que sometí para una de sus ediciones especiales pasé por el blog de Amber y me encantó su idea. Ella es una chica súper alegre y talentosa que acabo de encontrar en el mudo de los blogs y quien decidió hacer un blog roll de rechazos. Me encanto la idea!! Después de todo de eso se trata, de crear, inspirar, y disfrutar de las cosas lindas de la vida.

Asi que les muestro mi primer rechazo. Preparé esta tarjeta inspirándome en el sketch #7. Pueden ver los 81 sketches >>aquí<<. Para la gente de Paper Crafts No debe ser nada fácil ese proceso de selección. Les llegaron sobre 2,700 tarjetas que tenían que verificar en menos de una semana. Aunque no escogieron ninguna de mis tarjetas, la experiencia me gusto mucho pues me motivó a ser más atrevida en el uso de mis materiales. Poco a poco les iré mostrando las 7 tarjetas que sometí. Pero por el momento este es el rechazo #1 que fue inspirado en el sketch #7.

Hi!

Yesterday after NOT finding any e-mail from Paper Crafts related to my cards submissions and pondering what to do next with my rejected cards, I went to Amber’s blog and found the greatest post of all. She started a rejection blog roll; I found the idea so great that I will start showing my rejections too. I feel proud to be able to participate in this blog roll, I learned during this process and challenged myself to work more organized and get out of my comfort zone. I am proud to show you my rejections since I made them to create, inspire, have fun and share life’s wonderful things.

So this is my first rejection. It’s based on the sketch # 7. You can see all 81 sketches in >>here<<.


Relevant facts / Datos relevantes:

1-I made the small flower with Polymer Clay. / Yo misma hice la florecita del medio con Polymer Clay.

2- I love this colors. / Me encantan esos colores!!

3- I almost never use a single layer in a card. / Casi nunca trabajo tarjetas sencillas de un solo layer.

4- I colored the rhinestones with my Copics. / Pinté los rhinestones con mis Copics.


Recipe / Receta:

Stampin Up Whisper White cardstock.

Glimmer mist – Pink bubblegum.

Twine

Stampin up Heard From The Heart stamp set.

Dies: Doily Details Collection -Paper Trey

SU! Chocolate chip ink

Hand made polymer flowers.

FOAMY FLOWERS

Hola!

Hoy les tengo otra tarjeta utilizando el foamy como stamp. Las flores y botones los estampe con foamy y los botoncitos de la tarjeta son también de foamy. Luego de estampados, como que le hacia falta algo mas así que utilicé mi bolígrafo blanco para añadir las costuritas a la tarjeta.

Después de todo, me ha gustado el foamy para trabajarlo de esta manera y quizá algún otro detallito. Oficialmente he hecho las pases con el asi que por lo pronto tiene un hueco en mi mesa de trabajo. Con un poco de imaginación lo podemos usar y lograr resultados bien chulos.


Hi!

For today’s card I used foamy again to stamps the card. Both the flowers and the buttons are stamps made with foamy. After stamping I felt like something was missing so I grabbed my white gel pen and added the faux stitching.

After this week challenge I made my peace with foamy. I learned that there are creative ways to use it and that with a little imagination we can use it and obtain wonderful results.

Espero que tengan un buen día. / Hope you have a great day!


Recipe:

Finished size: 4.45" square

PT dies Beautiful Blooms II and Bottoned Up #2

SU cs in Whisper White & Craft

White Gel Pen

Foamy

Ink: SU Creamy Caramel and Blushing Bride


Thursday, March 3, 2011

USE FOAMY?? WHO?? ME??... NOOOO...

Usar Foamy?? Quien?? Yo!!! NOOOOO....

Esta tarjeta que les muestro hoy la hice para cumplir con dos retos esta semana. El primero es para un grupo bien especial que me reto a utilizar un sketch para completar mi tarjeta, el mismo es de Tuesday Morning Sketches. Este es el sketch que use:

Today’s card was inspired by two challenges. The first one is a sketch from Tuesday Morning Sketches. Here is the sketch I used for the card:


El segundo reto es el de esta semana en Paper Trey. Consiste en convertir el foamy en un stamp. Yo tengo un montón de foamy desde hacen ya varios años y en verdad hasta esta semana no se me había ocurrido hacer nada con el. Siempre pense que el resultado no se veia delicado. Ahora lo encuentro super util y en verdad que me ha encantado el look que le puede dar a una tarjeta. Simplemente necesitaba abrir mis imaginacion un poco y encontrarle un uso que fuera de acuerdo a mis gustos.

The second one is this week Make It Monday Challenger at Paper Trey. They challenged us to create our own stamp using foamy…wow! I have a lot of foamy that I purchased a few years now and never used it because I didn’t knew what to do with it. Thanks to this tutorial I was able to use this material and fall in love with it. I just needed to open my imagination.

Aquí esta la tarjeta. / Here is the card:


Que tengan un bonito día! / Have a great day!

Recipe:

Finished size: 5.5” X 4.25”

Stamp: PT Up Up & Away (sentiment)

Paper: SU Whisper White cardstock and Riding Hood Red

Ink: Memento Black, SU Riding Hood Red

Dies: PT Buttoned Up #2Limitless Layers 1 ¾” and Victorian Lace Border

Ribbon from my Stash

Black Foamy

White and black gel pen

Friday, February 25, 2011

PAPER TREY FEBRUARY BLOG HOP CHALLENGE


This month challenge is all about scallops. I love them!!

It's been a while since my last post so I decided to play along in the challenge. I loved this month release, I wanted everything!!... My package finally arrived yesterday with my new toys, this morning I opened all my stamp sets and used one of them in today's card.

Anyway, it's good to be back. Hopefully things at work will be reaching the normal levels again and I will have more time to play here.


OK, let's talk about today's card.

- I used little circle punches to make the top layer scallop.
- For the flower I used PT felt (I'm hooked with it) in Raspberry Fizz and cut it with the Beautiful Blooms II die collection. These flowers are little scallops circles so I guess they count too for the challenge. I cut the leave with PT felt too in Simply Chartreuse.
-I stitched the green panel with brown, yellow and pink floss. I'm not sure if I really like how it turns out but It looks interesting and adds a lot of texture to the card.
- For the sentiment I used a banner from the Banner Builder set and the sentiment is from Blooming Buttons Bit.
-The Buttons in the sentiment and flower where cut in chipboard and yellow cs using the Buttoned Up #2 die and stamped with the matching stamps from the Button Boutique set.
- The rhinestones are from my stash. They are clear rhinestones which I colored with a Copic in a matching color.
- Finally, I got the color combo from the Paper Crafts special edition Color Inspiration. This edition has become one of my favorite tools at my working table. I used SU cardstock and ink in matching colors. I don't have the exact name of the colors I used, but if you need them leave me a comment and I will let you know.

Here is the card, hope you like it. I had a really good time making it.

Have a great weekend!!

Besitos,
Joan


Monday, December 6, 2010

SHOW ME #4

Hi!

I am a little late with this week's post but better later than never right? I had a great weekend, I went yesterday to the Broadway show In the Heights at Bellas Artes. Yes, as you read, they brought the Broadway show here to PR. It is a great musical and I was so happy. For a moment I forgot I was in the island and found myself in a mental trip to the Big Apple.

But back to why we are here. Right now I have in my desk the two Sassy images I am working on. Last week I had a pre-senior moment because I was almost ready to post my card for the Color Me challenge and I completely forgot to finish it LOL! Anyway, I hope to finish them this evening when I get home from work.

Here is a pic of my desk right now:

Ohh, and I can't leave without sharing my emotion because I was the winner of last week's post. And Cheryl send me a wonderful digital stamp that very soon I will use for one of my creations. Thanks Cheryl, you made my day yesterday!! If you haven't visited Sassy Cheryls shop what are you waiting for?? I love her whimsical images. You can see a card I posted a while ago with one of her stamps >>in here<<

I hope you have a wonderful week, mine will be very busy but I will make my best effort to get here and have some fun.

XOXO,
Joan

Thursday, December 2, 2010

ESTAD QUIETOS / BE STILL...

Y reconoced que yo soy Dios. Ese es uno de los versos bíblicos favoritos de mi madre el cual he escuchado en el transcurso de mi vida. Cuando llega la adversidad siempre lo repito en mi mente y aunque no es fácil seguirlo le pido a Dios que me ayude a estar quieta y dejarlo obrar en cada una de mis situaciones.

Como practica para el curso de “Sponging” que estoy tomando con Kim Teasdale, había que hacer una escena anocheciendo. A mi me encantan los faros de luz pues se ven misteriosos, imponentes y tienen un propósito de guiar y dar luz. Así que tan pronto me pregunte que hacer con la asignación pensé en un faro y en ese versículo de la biblia y decidí hacerle un marquito a mami. Ya se lo entregue pues le estoy dando un detalle semanal hasta el día de navidad cuando le voy a entregar su regalo oficial de las navidades. El único cambio que le hice fue al mat del marco que este no me gusto como se vio y termine cambiándolo por uno azul claro con detalles azul marino que lo complemento mucho mejor. Pero no lo retrate así que les muestro este.

Espero que les guste y gracias por la visita.

And know that I am God. That’s one biblical verse that my mother has always repeat to us whenever we are facing a difficult situation. When adversity strikes, I always remember her words of wisdom and try to be still and let God guide my way thru it. It’s not easy, but I now He will act in our favor always.

As part of the course I am taking with Kim Teasdale, we had to make a breaking Dawn Scene. I have always love lighthouses; they give me a feeling of peace and at the same time find them mysterious. So as soon as I started my project I thought about this verse and a lighthouse and decided to make a frame for my mother. She loved it… Thanks God LOL! After I took this photo I changed the mat to a light blue with navy blue details but forgot to take a picture at the final result.

Hope you like it and thanks for the visit!